
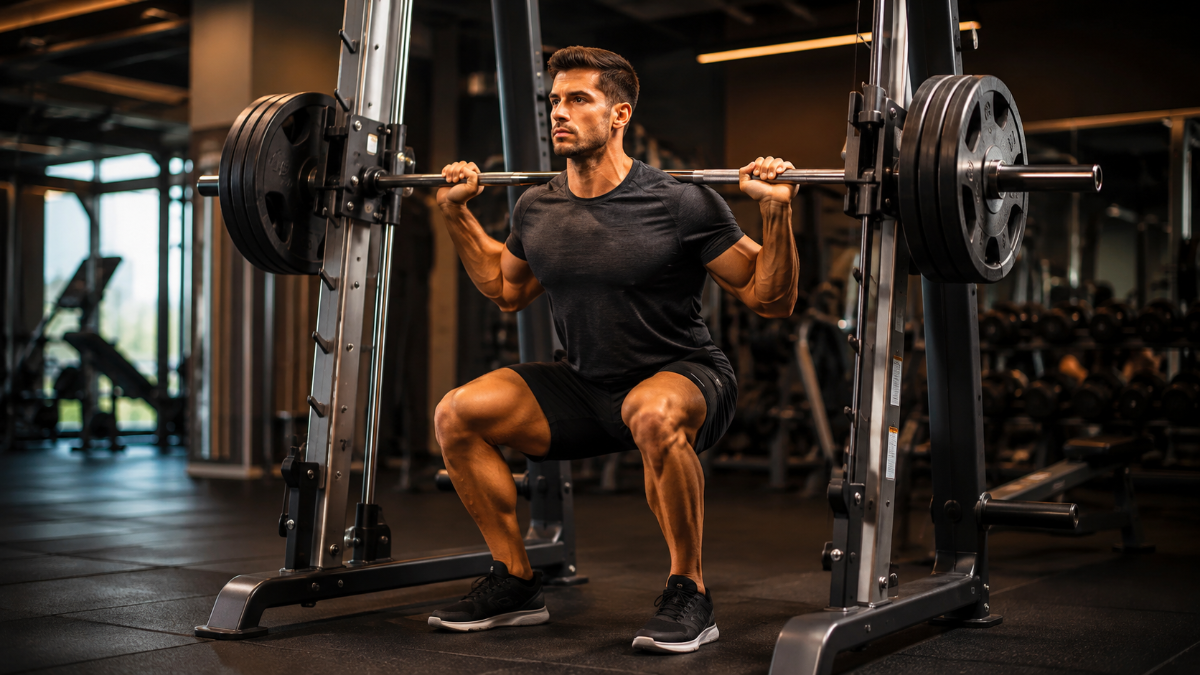
A guided-bar strength station lets the barbell move along fixed vertical (or slightly angled) rails, so you can lift heavy without a spotter.
Use it when: you’re training alone, chasing muscle isolation, or pushing close to failure safely.
Avoid it when: your goal is athletic performance, functional stabilizer strength, or you have unresolved knee/back pain that worsens with a fixed bar path.
- Pros: built-in safety catches, easier solo training, precise muscle isolation
- Cons: reduced stabilizer engagement, joint shear risk if alignment is off, bar weight often lighter than a standard barbell
What Is a Smith Machine and How Does It Work?
A smith machine is a strength-training station where the barbell attaches to vertical guide rails, restricting its path to a straight or slightly arced vertical line. Hooks along the rails lock the bar at any height, and a wrist-rotation motion releases or re-racks it-no spotter required.
Most bars on this equipment are counterbalanced, typically weighing 10–20kg rather than the standard 20kg Olympic barbell. Check the weight printed on the machine before comparing your numbers to free-weight lifts, since assuming standard bar weight will throw off your load calculations.
Two main variants exist:
- Standard (vertical) design – the bar travels in a straight up-and-down line.
- Linear/angled design – the bar follows a slight diagonal path that more closely mimics the natural arc of a free-weight squat or bench press, reducing shear stress on joints.
Who Should Use It (and Who Should Avoid It)
Match this equipment to your specific goal rather than treating it as universally good or bad-it excels at solo isolation work and struggles at building functional, athletic strength.
Also Read: Bonefish Grill
| Use Case | Fit | Why |
| Beginners learning form | Good | Fixed path removes balance demand, letting you focus on movement pattern |
| Hypertrophy / bodybuilding | Good | Mechanical tension drives muscle growth regardless of stability demands |
| Powerlifting / athletic performance | Poor | Doesn’t train the stabilizer recruitment and balance needed for a free barbell or on-field movement |
| Solo training without a spotter | Good | Safety catches function as an automatic spotter |
| Rehab under PT guidance | Case-by-case | Some knee protocols (e.g., quad-biased split squats) use it deliberately, some shoulder issues worsen with the fixed press angle |
| Home gym, limited space | Good | One station covers squats, presses, and rows without a full rack and spotter |
| Advanced lifters chasing 1RM on a free barbell | Poor as primary tool | Strength gains are largely modality-specific and don’t fully transfer to free-barbell strength |
Injury-specific guidance: For anterior knee pain, some coaches use heel-elevated split squats on the guided rail to bias the quads while removing rotational stress on the knee-a targeted technique, not a blanket recommendation, best applied with a physical therapist. For shoulder impingement, the fixed press angle can sometimes force an unnatural path that worsens discomfort, making free weights or cables preferable. For lower-back sensitivity, the guided squat path can reduce stabilization demand, but only if foot placement matches the rail-misaligned setup increases shear force on the spine and knees.
How to Use a Smith Machine Correctly
To use a smith machine safely: set the safety catches, position the bar at the correct height, unlock it with a wrist rotation, perform controlled reps with proper alignment, then re-lock it before stepping away.
Step-by-Step Setup
- Set the safety stops first. These catch the bar if you fail a rep-always adjust them before loading weight. This is the step beginners skip most often, and it’s what makes solo lifting genuinely safe.
- Position the bar at the right height. Shoulder height for squats, slightly above chest level for bench press (lying down), around knee height for rows or Romanian deadlifts.
- Load weight evenly and secure plates with collars so they can’t shift during the lift.
- Step into position, brace your core, and grip the bar at your intended width.
- Unlock the bar by rotating your wrists forward until it releases from the hooks.
- Perform the exercise with full control, keeping the target muscle under tension throughout.
- Re-lock the bar by rotating your wrists backward until it catches-confirm it’s secure before letting go.
Foot Placement and Bar Alignment (Squat Example)
Because the bar can’t shift forward or back to match your body’s natural arc, your feet have to move instead.
- Stand with feet 6–12 inches in front of the bar’s vertical line, not directly underneath it-this lets your hips sit back naturally instead of forcing your torso upright against a purely vertical path.
- Keep a slight forward lean through the torso, standing bolt upright with feet directly under the bar increases shearing force on the knees.
- Cue: “Chest up, knees track over toes, weight through the mid-foot”-if pressure shifts into your toes or heels, adjust your stance distance from the rail.
- If knee discomfort persists, bring your feet back slightly toward the bar’s line to shift more load into the hamstrings and glutes, reducing shear on the knee joint.
For bench press, grip width should mirror your free-weight setup-typically slightly wider than shoulder-width-with the bar lowering to mid-chest, not the neck or lower ribs, to keep the shoulder joint in a safe path.
Common Setup Mistakes to Avoid
- Skipping the safety-stop adjustment, which removes the machine’s core safety advantage.
- Loading based on standard 20kg-barbell math without checking the actual (often lighter) bar weight.
- Standing directly under the bar for squats instead of slightly in front of it.
- Locking elbows or knees at the top of a rep instead of maintaining a slight bend.
- Leaning back into the rack during squats, which removes hamstring activation and increases knee shear.
- Rushing the re-rack step-this is when most injuries on this equipment happen.
Read More: Generation Genius
Common Myths, Debunked
“It’s cheating” is the most persistent myth, and it doesn’t hold up against research on how muscle actually grows. Hypertrophy is driven primarily by mechanical tension on the muscle fiber, not by how much balance or stabilization a lift demands. Meta-analyses comparing free weights and machines have found no significant difference in hypertrophy outcomes between the two modalities when volume and intensity are matched.
- Myth: “It builds less muscle than free weights.” Research shows comparable muscle growth between machine-based and free-weight training under matched training conditions.
- Myth: “It’s only for beginners.” Advanced lifters use it for mechanical drop sets, partial-range overload, and pushing safely to failure-techniques that require training experience to apply well.
- Myth: “Free weights always build more strength.” Strength gains are largely modality-specific-training on a barbell builds barbell strength, training on a guided rail builds strength specific to that movement pattern. Neither transfers perfectly to the other.
- Why gym culture dismisses it anyway: The stigma largely comes from lifters using it as their only training tool rather than any inherent flaw in the equipment itself.
When It’s Actually Superior to Free Weights
There are specific scenarios where the fixed path is a genuine advantage rather than a compromise:
- Training for true muscular failure alone. Without a spotter, free-weight failure sets on squats or bench press carry real injury risk. The safety catches remove that risk entirely.
- High-fatigue isolation work. Late in a workout, when stabilizer muscles are already fatigued, the guided bar lets you keep training the target muscle without technique breakdown from balance loss.
- Mechanical drop sets. Shifting a bench from incline to flat to decline without re-racking is far easier and safer than with free weights.
- Targeted rehab protocols. As noted above, specific fixed-path variations (like heel-elevated split squats) can isolate certain muscles while controlling for rotational stress.
Muscles Worked
The muscles trained on a guided bar span virtually every major group-the fixed path changes stabilizer demand, not which muscles the exercise itself recruits.
| Muscle Group | Primary Exercises |
| Quadriceps & glutes | Back squat, front squat, split squat, hack squat |
| Hamstrings & glutes | Romanian deadlift, hip thrust, single-leg deadlift |
| Chest & triceps | Flat/incline bench press, close-grip press |
| Shoulders | Seated overhead press, upright row |
| Back | Bent-over row, inverted row, shrug |
| Calves | Standing calf raise |
Top 5 Smith Machine Exercises: Full Breakdown
1. Back Squat
Setup: Bar at shoulder height, feet 6–12 inches in front of the rail’s vertical line, bar resting on the upper traps.
Form cues: Chest up, hips back, knees track over toes, descend until thighs are at least parallel.
Common mistakes: Standing directly under the bar (increases knee shear), leaning into the safety rack for support, rising onto toes.
Rep range: 8–12 for hypertrophy, 12–15 for beginners building movement pattern confidence.
2. Bench Press
Setup: Bench centered under the bar, bar aligned with mid-chest, grip slightly wider than shoulder-width.
Form cues: Shoulder blades pulled back and down, elbows at roughly 45 degrees from the torso, controlled bar path to mid-chest.
Common mistakes: Flaring elbows to 90 degrees (shoulder strain risk), bouncing the bar off the chest, uneven grip width.
Rep range: 8–12 for chest hypertrophy.
3. Romanian Deadlift
Setup: Bar at hip height, feet hip-width apart, slight knee bend.
Form cues: Hinge at the hips while keeping the bar close to the legs, maintain a neutral spine, stop when you feel a hamstring stretch.
Common mistakes: Rounding the lower back, bending the knees too much (turns it into a squat), bar drifting away from the legs.
Rep range: 10–12 for hamstring and glute development.
4. Seated Shoulder Press
Setup: Bench upright directly under the bar, bar starting at collarbone height.
Form cues: Press straight up without arching the lower back excessively, control the descent.
Common mistakes: Excessive lower-back arch to compensate for shoulder mobility limits, pressing too far forward or back relative to the fixed rail.
Rep range: 8–12.
5. Hip Thrust
Setup: Upper back braced against a bench, bar positioned across the hips with padding, feet flat on the floor.
Form cues: Drive through the heels, squeeze glutes at the top, avoid hyperextending the lower back.
Common mistakes: Overextending at the top, feet placed too far forward or back (reduces glute tension).
Rep range: 10–15.
Smith Machine vs. Free Weights vs. Power Rack
Free weights build more stabilizer strength and functional carryover, the smith machine offers safer solo training and precise isolation, a power rack sits in between, offering barbell freedom with built-in safety pins.
| Tool | Best For | Trade-off |
| Free-weight Olympic barbell | Functional strength, athletic transfer, powerlifting | Requires a spotter for heavy failure sets |
| Smith machine | Solo isolation, hypertrophy, controlled failure training | Reduced stabilizer engagement, fixed path may not match your natural mechanics |
| Power rack | Heavy compound lifts with safety pins, retains free-bar mechanics | Needs more space, still benefits from a spotter for maximal attempts |
| Selectorized machines (leg press, chest press) | Beginner-friendly isolation, injury-specific rehab | Limited to a single movement pattern per machine |
Research comparing these modalities supports treating them as complementary rather than competing: free-weight training tends to produce greater strength gains when tested on free-weight lifts, while machine training produces greater gains when tested on machine-based lifts, with no overall difference in hypertrophy or power. In practice, the tool you train with should match the outcome you’re testing or performing.
Smith Machine Workout Plans: Beginner Full-Body Routine (2–3x per week)
- Squat – 3 sets x 12 reps
- Flat bench press – 3 sets x 12 reps
- Bent-over row – 3 sets x 12 reps
- Seated shoulder press – 3 sets x 12 reps
- Calf raise – 3 sets x 15 reps
Rest 45–60 seconds between sets and warm up with an unloaded bar to rehearse the movement pattern.
Intermediate Push/Pull/Legs Split (4–5x per week)
- Push day: incline press, flat press, seated shoulder press, calf raise
- Pull day: bent-over row, inverted row, shrug, upright row
- Leg day: back squat, Romanian deadlift, split squat, hip thrust
Work in the 8–12 rep range with progressive overload weekly.
Advanced Hypertrophy Programming
Advanced lifters can use mechanical drop sets (moving from incline to flat to decline press without re-racking) or partial-range overload sets on calf raises and shrugs, where the fixed path allows safer near-failure training. Pairing isolation work here with free-weight compound lifts in the same session-free weights first while fresh, guided-bar work second for accessory failure sets-is a common advanced strategy that reflects how the research supports combining both modalities.
Choosing the Best Smith Machine for a Home Gym
Prioritize a counterbalanced bar mechanism (reduces effective bar weight), a linear or slightly angled rail system (mimics natural movement paths better than a purely vertical track), adjustable safety catches at short increments, and a weight capacity comfortably above your current max. Pricing and model availability change frequently, so check current retailer listings and verified reviews before purchasing rather than relying on older buying guides.
Key Takeaways
This equipment isn’t a shortcut, and it isn’t a gimmick-it’s a tool suited to specific goals. Used with correct foot placement, appropriate safety-stop setup, and awareness of its fixed bar path, it builds muscle just as effectively as free weights for hypertrophy goals, while offering safety advantages free weights can’t match for solo training. Where it falls short is functional, athletic strength transfer-for that, free weights and a power rack remain the better long-term investment.
Frequently Asked Questions
Is using a smith machine cheating?
No-this is a persisting gym myth without scientific backing. Hypertrophy is driven mainly by mechanical tension on the muscle, and research comparing free-weight and machine-based training consistently finds no significant difference in muscle growth between the two. The stigma comes from lifters using it as their only training tool rather than any inherent flaw in the equipment itself.
Why do some gym-goers dislike it?
The dislike largely stems from strength specificity: gains made on a guided bar transfer imperfectly to free-barbell lifts, so lifters who train exclusively on it often underperform when tested on a standard barbell. It also reduces stabilizer and core engagement compared to free weights, which matters for athletes needing functional strength transfer, even though it doesn’t affect muscle size gains.
Is it bad for your knees?
It depends entirely on foot placement, not the equipment itself. Standing directly under the bar with an upright torso increases shearing force on the knees, positioning your feet several inches in front of the bar’s line and allowing a slight forward torso lean redistributes that load into the hips and hamstrings, reducing knee stress.
Can it help with squat rehab after a knee injury?
In specific, guided cases-such as heel-elevated split squats used to bias quad activation while controlling rotational stress-it can be a useful rehab tool. This should be programmed by a physical therapist or qualified trainer, since not every knee condition responds well to the fixed bar path, and improper setup can worsen symptoms.
How much does the bar weigh compared to a standard barbell?
It varies by model, typically 10–20kg due to counterbalance mechanisms, compared to a standard 20kg Olympic barbell. Always check the weight printed on the machine before comparing your lifts to free-weight numbers.
Does this build the same strength as free weights?
Muscle size gains are comparable, but strength gains are largely modality-specific-research shows free-weight training produces greater gains when tested with free weights, while machine training produces greater gains when tested on machines, with similar results for hypertrophy and power output overall.
What’s the difference between a vertical and angled (linear) design?
A vertical design moves the bar in a straight up-and-down line, while an angled version follows a slight diagonal path that better mimics a free barbell’s natural arc. Angled versions are generally considered more joint-friendly for squats and presses because they reduce shear force from mismatched movement paths.
Can I do deadlifts on it?
Conventional deadlifts don’t suit the fixed path since they require a natural hip-hinge that a vertical bar can’t accommodate safely. Romanian deadlifts and stiff-leg variations work well instead, since their more limited range of motion aligns with the guided vertical track.
Should beginners start with this or free weights?
Either can work, but many coaches recommend beginners start on the guided rail to learn basic movement patterns like the squat and bench press before progressing to free weights, since the fixed path reduces the coordination demand needed to control balance and bar path simultaneously.
How often should I use it versus free weights each week?
A balanced approach for most lifters prioritizes free weights for 2–3 primary compound lifts weekly, reserving the guided-bar station for accessory, isolation, or solo-training days. Athletes emphasizing functional strength should lean more heavily on free weights, those focused purely on muscle size can use either interchangeably based on convenience and preference.